Embroidery of alphabets such as names, initials and messages in handkerchiefs and pouches. I’d like to challenge the embroidery of letters, but if you do embroidery by yourself, there may be people who seem to have difficulty and can’t get their hands on.
Therefore, this time I would like to introduce the method, tips and design examples of embroidery letters that can be easily and beautifully finished even for those who are trying embroidery alphabets for the first time.
If letter embroidery can be inserted, the width of the embroidery design will be greatly expanded.
Please take your time to enjoy this article.
Types of Letter Embroidery
In a word of letter embroidery, it can be expressed in various ways depending on the stitching methods.
A relatively easy approach for beginners is to draw alphabets by simply stitching lines.
If you want to make the text a little thicker, or if you want to express various fonts, you can use a method of bordering and filling the inside.
In addition, this is for more advanced people, but there is also a method of embroidering the original font with various designs and decorations on the letters that you can enjoy the expression unique to embroidery.
Even if it is called letter embroidery, the range of expression is very wide, so if you choose a font according to the work you want to make, you will be able to enjoy embroidery more♪
Basic Stitches Used in Letter Embroidery
Introducing the basic stitches used for letter embroidery and what kind of fonts should be used for each stitch.
Letter embroidery is roughly divided into “line” and “fill” stitches.
Back Stitch
For beginners of embroidery, it is easy to work with a letter using back stitch.
This stitch is not suitable for drawing a smooth curve, but it is recommended when you want to put a rough handwritten style.
The trick of putting letters in back stitch is not only to make each stitch too wide, but also to align the width.
Outline Stitch
Outline stitch is suitable when you want to make a smooth curve and express the line clearly.
It is necessary to get used to stitching the curved part, but you can make a beautiful curve by unifying the direction in which the threads are stacked while carefully layering the threads.
The trick is not to pull the thread too much.
Satin Stitch
This is a stitch that fills letters, and is used to fill a font that is outlined with an outline stitch.
The point to make beautiful letters is to sew straight horizontally so that the satin stitch threads of all the letters you want to make are parallel.
By combining these three stitches, how to pick up the thread, and coloring, you can make a variety of letters.
Basic Letter Embroidery Process
Introducing the actual work process when embroidering letters.
I will explain how to insert letters with simple lines and how to insert letters to fill in the initials.
■ How to Insert Letters in Line
1. Draw a line where you want to put letters
This is a draft. Draft the image of the finished embroidery on the fabric you want to make letters on. Since this draft will be used as an embroidery guide, it is important not to cut corners at work.
2. Insert the needle along the line
Sew back stitches or outline stitches along the lines drawn in the draft. It is important to put a letter neatly to advance while pulling all the needle thread one needle.
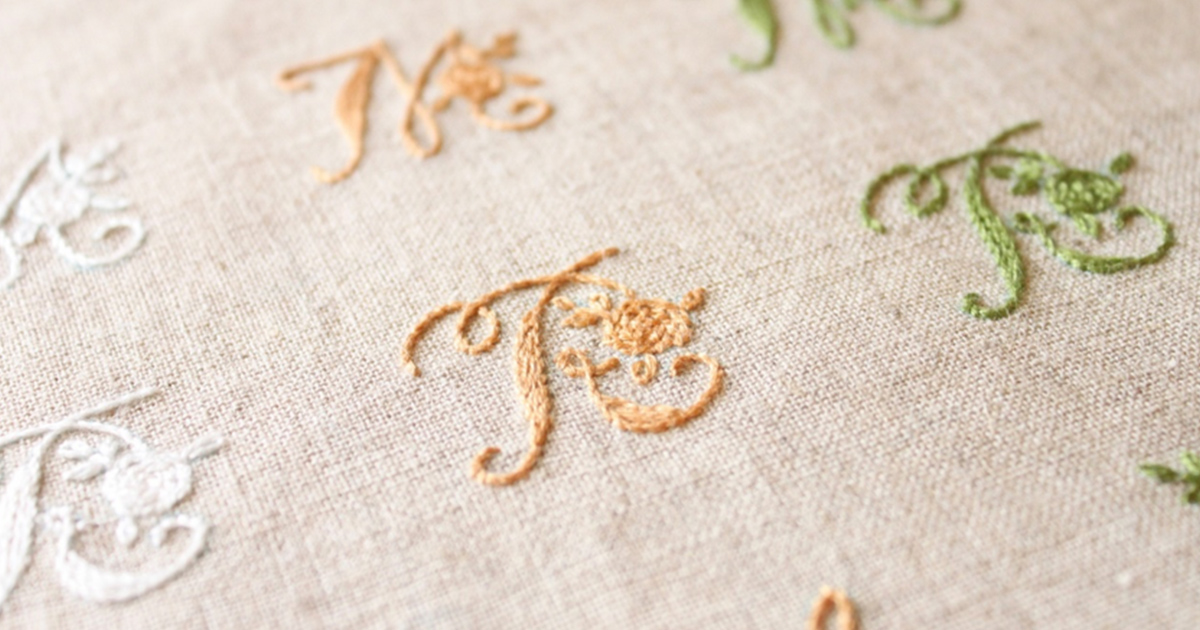
■ How to put initial letters
1. Draw an outline on the fabric
Transfer the design of the letters you want to draw to the fabric. It can be handwritten or a combination of designs from the books and websites.
Copy the design by putting a piece of dressmaker’s tracing paper between the paper and the fabric and pressing it firmly with a pen.
2. Bordering
The stitch you will use is an outline stitch. First you sew from the border of the letters. By putting the line neatly, you can draw embroidered letters with a three-dimensional feeling and luxury, so let’s carefully trim them.
3. Fill the Surface with Satin Stitch ①
You will fill the surface with satin stitches, but there are important points. The first step is to fill a wide surface with rough stitches while leaving a certain gap. At this time, you will stitch it with keeping in mind that you are making the threads parallel.
4. Fill the Surface with Satin Stitch ②
Next, you will fill up the gaps precisely as if there no no gaps left. At this time, I will pierce the needle carefully while paying attention to the parallel stitches. You are done when you fill up all of the gaps in the letters.
References of Examples for Embroidery Letter Designs
Even if it is called letter embroidery, there may be some people who do not know how to actually make it.
Here are five examples of letter embroidery designs that are relatively easy to work on and can be applied to various designs.
Even simple back stitches can be used to create stylish embroidery depending on the arrangement of the letters. Add a one-point illustration to make an accent and make a great work. It is a design sample that even beginners can easily work on and enjoy fashionable.
Embroidered by simply putting one letter of the initial alphabet. Put a commercially available patch to make it unique. It can be used in a variety of applications such as pouches, small items, and lunch bags.
A letter embroidery designed to leave the gaps in the letters. Even beginners can easily make stylish letter embroidery, so it is recommended.
Once you get used to letter embroidery, you can create a cute embroidery with just a single text decoration. Just adding a simple illustration will change the finished product.
This is a design example for advanced people, but it is an original design letter embroidery. The best part of embroidery is that you can do anything you want.
Let’s make letters with embroidery!
How was it? Embroidery is a technique that most people may feel overwhelmed, but each work is very simple when considering the work process.
It’s surprisingly easy to get rid of preconceptions and work on it.
Even with basic stitch combinations, if you devise colors, layouts, and designs, you can create your own embroidery works.
If you find it difficult to embroider, you may want to ask a specialist or company to do that for you with a tiny cost.