A stencil that is popular when you create an original item easily.
It is fun to print fonts on a T-shirt by yourself. Moreover, it is easy to make matching items once you create a template. However, commercially available stencil plates may not have a design you like or may not be the right size you want.
“I want to print an original stencil on my T-shirt!”
Let’s try making your own stencil! This time, I will introduce the procedure that I made my first T-shirt with a stencil and techniques you should be careful about.
By the way, what is a stencil?
Stencil is a printing technique in which a pattern cut out of fonts, illustrations, numbers, etc. are printed on paper or cloth using paint or ink. There are three types of stencil types sold at stores, and they can be printed on materials other than fabric.
Metal plate: sturdy and can be used repeatedly but expensive.
Plastic: easy to bend so curved edges are easy to be printed.
Paper: A low-priced, oil-coated paper. Durability is low.
This time, I wanted to make a stencil T-shirt with a reasonable price, so I decided to make it myself using cloth ink that I had at home and items from a Dollar store.
DIY my own stencil T-shirt!
Preparation
Cutting sheet for stencil (Dollar Store)
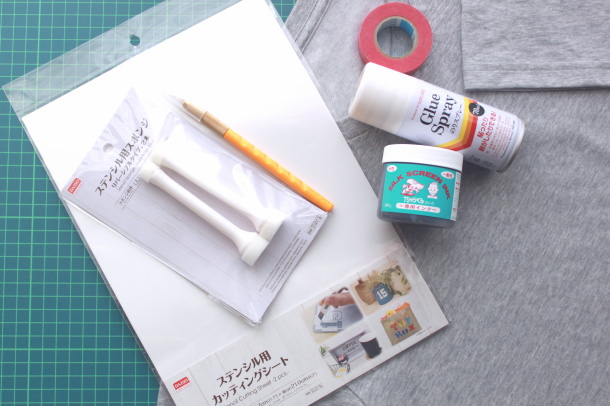
A4 size translucent cutting sheet. You can also use a clear holder.
Stencil sponge (Dollar Store)
It is convenient to use a stencil sponge since you need to apply a colored ink by tapping. A magic melamine sponge is okay to be used instead.
Design Knife
The design knife is easy to use when you cut small and curved detail. You can find it in the craft section of a Dollar store.
Fabric Ink
This time, I used fabric ink (100g 540 yen=$5).
Spray Glue (Dollar Store)
If you use a T-shirt with a mold made of a cutting sheet, the ink will not bleed easily.
Masking Tape
Use this when you want to copy illustrations or fonts on a sheet or to cut them.
Cutting Mat
Use when cutting the mold with a design cutter to avoid damaging the desk. You can also use newspaper or cardboard.
2. Preparing illustrations and fonts
For the illustration, I chose headphones from the copyright-free pixabay. The font characters I used were Windows 10 standard font “Segoe UI Black” (size 72). After arranging and adjusting the size with Excel, I printed it on A4 plain paper.

3. Paste the printed paper on the cutting mat
Affix the four corners of the printed paper to the cutting mat with masking tape.

4. Place the cutting sheet on top of the printed paper
Place the cutting sheet (clear plastic holder over the paper affixed on the cutting mat with masking tape (see Step 3)

5. Cut the cutting sheet
You cut them little by little with a design knife while you can see illustrations and fonts of the printing paper placed under the cutting sheet.

Unfortunately, I made a mistake here! I cut off the thin line completely. And the font is …

The curve is not smooth. The straight line is also wavy … Well, it’s hard!

OK, I was able to cut all illustrations and fonts.

6. Spray glue the back of the cutting sheet
Turn over the cutting sheet on the newspaper and apply glue spray from a position 15 to 20 cm (6 to 8 inches) away. I left it for about 10 seconds and blended the glue.

7. Put a cutting sheet on the T-shirt
Place the cutting sheet with glue on the T-shirt. Put the separated parts in the same way, such as in illustrations and font “O”.

8. Prepare fabric ink
This time, we used a bottle type of fabric ink, so we took a small amount of ink with a spoon and placed it on a lid of a bottle as a palette.

For T-shirts, put newspaper or cardboard between them so that the ink does not reach the back. This time I forgot and a little bit of ink went through to the back (> <)
9. Apply fabric ink
Apply ink to the stencil sponge and apply it with small taps.

The place where you have a lot of area to paint is where you wonder how much you should apply.

10. Remove the cutting sheet
When you finish painting, gently remove the cutting sheet. I sprayed glue, but it was easy to remove.

Use tweezers or a toothpick to peel off the part that was cut off.

11. Finally completed!
This picture was immediately after removing the cutting sheet. I was able to paint almost without blur.

But after it was air-dried…
The headphones were uneven in color. I was shocked because I didn’t notice when I was painting! ! It is important to keep the amount of the ink constantly to be applied.

After this, I ironed it for about 2 minutes and it’s finally completed! I was worried because I sprayed glue, but it was okay because I ironed the T-shirt over a rug.
I tried washing once, but it didn’t have any discoloration or cracks because I used fabric ink!

Advantages and disadvantages of DIY stencil T-shirts
The hard part of making a stencil T-shirt was cutting out the cutting sheet. Curves and details were difficult to cut, and it took time. However, I was happy that I could make an original T-shirt with my favorite design.
Advantages to make your own stencil T-shirt
You can make your favorite design
You can make your own T-shirts by arranging your favorite illustrations.
Can be matched
Matching items, such as T-shirts and bags, for parents and children. You can also make T-shirts with different colors by changing the color of the fabric ink.
Feel free to make
Cutting sheets for stencils, sponges for stencils, cutters, glue sprays, masking tapes, cutting mats are available at a Dollar Store, and fabric inks can be replaced with fabric ink stamps at a Dollar Store. The total cost would be about 700 yen to create a DIY stencil T-shirt (=$7).
T-shirt can be anywhere you want
You can stencil not only on the front of the T-shirt, but also anywhere you like, such as the back or sleeves.
Disadvantages to make a stencil T-shirt
Cutting a cutting sheet is difficult …
It takes time to cut out a cutting sheet. Also, it is easy to make mistakes if there are a lot of fonts and the design has small fine details.
Limited font types
Curves are particularly hard to cut out, so the fonts used are limited.
Difficult to color evenly
Since it is colored with a sponge, it may stick too much or fade.
The finish changes depending on the fabric
Strong stretch fabrics and polyester fabrics may not be suitable for stencils, as the stencil part tends to peel off more easily than the printed T-shirts which are factory-made.


